Welcome to the page of all things 12 Volt! The information here was
either excerpted from various sources on the web and in the public
domain,
or results directly from my personal experience. When researching
battery
specs for this page, I was amazed at the wide variance in some of the
information.
For instance; the charts that show voltage related to state of
charge...
almost every chart I looked at had different voltage values. I had to
make
a judgment call and pick the chart that best matched my own
observations
on my own 12 volt system. I tried to keep "opinion" to a minimum in the
interest of putting out good, useful information, but where the sources
of the information differ, I had to make an opinion call. Just so you
know...
the data on batteries contained herein is the best I can come up with,
but may not be gospel. Some of the suggested RV modifications require
you
to be at least a little handy... Don't undertake any project beyond
your
capabilities and be especially careful anytime you are working in
proximity
to the batteries. They can be really dangerous if treated wrong... acid
is caustic and batteries can explode if a spark or open flame ignites
the
hydrogen gas they produce. Shorting the output terminals of a battery
can
create huge sparks and sprays of molten metal (can you say "welding"?)
When working with batteries, you need to have plenty of ventilation,
remove
jewelry, wear protective clothing and eye wear (safety glasses), and
exercise
caution. Whenever possible, please follow the manufacturer's
instructions
for testing, jumping, installing and charging. Use proper care at all
times
and don't EVEN try to sue me if you screw up... I warned you! Please
see
the disclaimer before
proceeding!
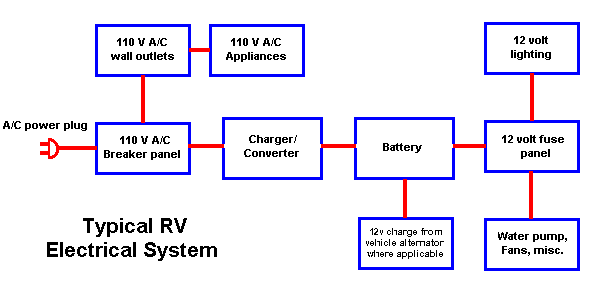
Introduction
One of the best things about an RV is the self-contained power system
that allows us to have all the comforts without being plugged into an
electric
outlet. This 12 volt system can be a joy or a headache, depending on
how
you maintain and utilize it. If you ignore basic maintenance, it'll let
you down at the worst possible time! An understanding of the components
and principles involved is necessary to get the most out of your 12
volt
system. Relax, tho... it's not "rocket science"!.... your 12 volt
system
is simple and very easy to understand and maintain. Let's just take
a
look at a block diagram of a typical RV 12 volt system.
See.. there's really nothing to it! In the simplest terms, you have
lights
and other equipment such as water pump, fans, stereo, etc. that run on
12 volts, a battery that supplies the 12 volt power and some sort of
charger
to replenish the energy that you use from the battery. Of course, it's
possible to add lots of useful components to this simple system to make
it more flexible, but the basic 12 volt system in any RV starts with
the
components shown above.
As you read through this information, we will talk
about all the different
parts of this system and discuss some of the very useful additions and
improvements that you can make yourself. Also included will be some
highly
technical info that you can bypass if it doesn't interest you. So,
let's
get started by talking about batteries. The battery is the heart of the
12 volt system. No other single component is as critical to the
system's
functioning as your battery system! That's why a lot of time needs to
be
spent talking about the care and feeding of your battery(s).
What's a
battery?
Sure, we all know what a battery is.... it's that thing that goes dead
when you leave the headlights on overnight! Actually, there's a little
more to it than that, so perhaps a review of battery basics is in order
here..
A battery is an electrical storage device. Batteries
do not make electricity,
they store it, just as a water tank stores water for future use. As
chemicals
in the battery change, electrical energy is stored or released. In
rechargeable
batteries this process can be repeated many times. Batteries are not
100%
efficient - some energy is lost as heat and chemical reactions when
charging
and discharging. If you use 1000 watts from a battery, it might take
1200
watts or more to fully recharge it. Slower charging and discharging
rates
are more efficient. Practically all batteries used in RV applications
are
Lead-Acid type batteries. Even after over a century of use, they still
offer the best price to power ratio.
Batteries are divided in two ways, by application
(what they are used
for) and construction (how they are built). The major applications are
automotive,
marine,
and deep-cycle. Deep-cycle includes solar electric
(PV), backup
power, and RV and boat "house" batteries. The major construction types
are flooded (wet), gelled, and AGM
(absorbed glass
mat). AGM batteries are also sometimes called "starved electrolyte",
because
the fiberglass mat is only 90% saturated with Sulfuric acid. Flooded
may
be standard, with removable caps, or the so-called "maintenance free"
(without
caps). All gelled are sealed and a few are "valve regulated", which
means
that a small valve keeps a slight positive pressure in each cell. Most
AGM batteries are sealed and valve regulated. Sealed gell and AGM
batteries
offer the convenience of no maintenance and produce less gas, so at
first
glance, they may appear more attractive than standard flooded cell
batteries.
There is a down side here, tho.... These batteries, especially the gell
cell type, require precise control of the charging process to prevent
permanent
damage by overcharging. They also tend to be significantly more
expensive
and have a somewhat shorter lifespan. It all depends on what premium
you
put on the maintenance free aspect of it. In my opinion, the standard
flooded
cell battery offers better overall performance for the price and will
probably
last a lot longer in most common RV applications. The need to add water
periodically is a small price to pay for the advantages you get. I
strongly
suggest that you avoid the "maintenance free" flooded cell batteries...
they truly aren't a good design: they are simply a standard flooded
cell
battery with sealed cells. Each cell has a small valve to release
excessive
pressure. They still can be run low on electrolyte with heavy usage and
fast charging, and there's no way to add water, so the batteries often
die young.
It's important to understand the differences in
battery types...
Starting batteries are normally
used to start and run engines.
Engine starters need a very large starting current for a very short
time.
Starting batteries have a large number of thin plates for maximum
surface
area. The plates are composed of a Lead "sponge", similar in appearance
to a very fine foam sponge. This gives a very large surface area, but
if
deep cycled, this sponge will quickly be damaged and will fall to the
bottom
of the cells. Automotive batteries will generally fail after 30 or more
deep cycles.
Deep cycle batteries are designed
to be discharged down as much
as 80% repeatedly, and have much thicker plates. The major difference
between
a true deep cycle battery and others is that the plates are solid Lead
plates - not sponge. Unfortunately, it is often impossible to
tell
what kind of battery you are really buying in some of the discount
stores
or places that specialize in automotive batteries.
Many Marine batteries are actually
"hybrid", and fall between
the starting and deep-cycle batteries, while a few are true
deep
cycle. In the hybrid, the plates may be composed of Lead sponge, but it
is coarser and heavier than that used in starting batteries.
It is
often hard to tell what you are getting in a "marine" battery, but most
are a hybrid. "Hybrid" types should not be discharged more than 50%.
A battery's capacity for storing energy is rated in
several different
ways, depending on the battery type. Starting batteries are often rated
in Cold Cranking Amps or CCA. CCA is the discharge load in amps which a
battery can sustain for 30 seconds at 0 degrees F. and not fall below
1.2
volts per cell (7.2V on 12V battery). This battery rating measures a
burst
of energy that a car needs to start on a cold morning.
Deep cycle batteries are often rated in Amp/Hours.
Amp/Hour rating of
battery capacity is calculated by multiplying the current (in amperes)
by time (in hours) the current is drawn. For example: A battery which
can
deliver 4 amperes for 20 hours before being discharged would have a 80
amp-hour battery rating (4 X 20= 80).
You may also see batteries rated with a Reserve
Capacity. RC is
the number of minutes a new, fully charged battery at 80 degrees F.
will
sustain a discharge load of 25 amps to a cut-off voltage of 1.75 volts
per cell (10.5V on 12V battery). This battery rating measures more of a
continuous load on the battery. For RV use, this rating is a little
less
useful, as the common loads that RV use puts on a battery are a lot
less
than that 25 amp load used to determine RC.
I feel that the best bet is to consider batteries by
their amp/hour
rating, so that is the rating method used throughout this article.
Selecting
batteries
Now that we know a little more about batteries, it becomes obvious
what we should be using in the RV. Deep cycle batteries! When you
unplug
from the A/C line and go boondocking for a weekend, you are using only
your batteries to provide power for your rig. It's not uncommon for
those
batteries to be fairly well discharged before you get back to
civilization
and plug in. Starting batteries and "Marine" batteries just aren't
designed
for this kind of use and will die an early death in your RV. Use only
deep
cycle batteries! This is so simple that you'd think it would be a
no-brainer,
but a lot of RVs (especially used ones!) leave the dealer's lot with
starting
or Marine type batteries installed. If you recently bought your rig, it
may be worthwhile to check and see just what batteries you actually
have
installed.
Selecting the correct batteries is all about
lifespan.... The right
batteries will last a lot longer, leaving you with more money for the
finer
things in life! The lifespan of a battery will vary considerably with
how
it is used, how it is maintained and charged, temperature, and other
factors.
We'll talk more about maximizing the lifespan of your batteries later,
but for now, here are some typical expectations for batteries used in
deep
cycle service:
Starting:
3-12 months
Marine:
1-6 years
Golf cart:
2-8 years
Deep cycle
(L-16 type etc.): 4-8 years
AGM deep cycle: 4-10 years
Gelled deep cycle: 2-5 years
A lot of RVs come from the dealer with just a single Group 24 deep
cycle
or Marine battery installed. Many have room for additional batteries
and
some battery boxes will accommodate larger batteries. Now, folks... if
you NEVER camp without electric hookups, you need worry little about
battery
selection... in fact, you might as well not bother reading any further.
On the other hand, if you like to really get away from it all and
consider
hookups optional at best, then a good rule of thumb is to get as large
a battery as will fit in your existing battery box... The more amp
hours
of capacity you can fit, the longer you can go between re-chargings.
There are a lot of different battery sizes out
there... here are some
common battery size codes and approximate sizes and ratings:
Battery Type
Dimensions in inches ( L x W x H)
Weight
Capacity
Voltage
Group 24
10.87 X
6.58 X 9.97
53 lb.
70-85 Amp hours
12 volts
Group 27
12.60 X
6.60 X 9.97
63 lb.
85-105 Amp hours
12 volts
Group 31
12.94 X
6.74 X 9.88
68 lb.
95-125 Amp hours
12 volts
4-D
20.73 X
8.66 X 10.27
130 lb.
180-215 Amp hours
12 volts
8-D
20.62 X
10.95 X 10.17
158 lb.
225-255 Amp hours
12 volts
Golf cart & T-105
10.37 X 7.13 X 11.57
61 lb.
180 to 220 Amp hours
6 volts
L-16
11.69 X
7.13 X 16.69
114 lb.
340 to 380 Amp hours
6 volts
A lot of RVers have switched from the "standard"
group 24 or 27 12 volt
batteries to the larger 6 volt golf cart batteries. If you have room
for
at least 2 of them, they are a good choice. They are true deep cycle
batteries
and will last a lot longer than most common 12 volt batteries in your
RV.
They are physically larger, so you must measure carefully before buying
them, but I recommend you use them if you can. I have a set of Trojan
Golf
cart batteries that are going on 5 years old and they still have almost
all of their original capacity. They are priced about the same as (or a
bit lower than) the common 12 volt deep cycle battery. Golf cart
batteries
have a higher capacity than group 24 and 27 batteries... a pair of
group
24 12 volt batteries only provide 140-170 amp/hours of capacity, where
a pair of golf cart batteries provide 180-220 amp/hours. There are
other
deep cycle batteries available, such as the L-16 and AGM types, that
are
extensively used in large solar and alternate energy systems, but their
physical size and added expense make them a less attractive choice for
the average RVer.
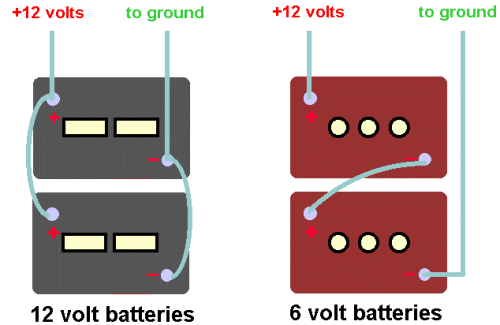
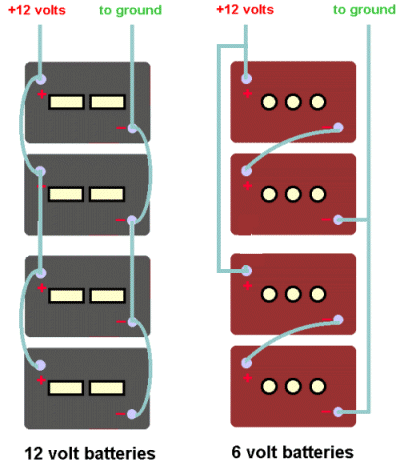
If you have room and want to change over to the 6
volt golf cart batteries,
you must make an important wiring change. Most rigs that have 2 or more
12 volt batteries have them wired in parallel. when going to the 6
volters,
you must wire pairs of them in series to produce the needed 12 volts.
This
is actually simpler than it sounds.... see the diagrams below.
When installing new batteries, first mark the cables
so you do not forget
which one is which when you reconnect. If you are changing over from a
pair or set of 12 volt batteries to a pair or set of 6 volt batteries,
some changes in cabling will be required. See the wiring drawing above
for an example.. If you don't fully understand what the difference is
between
parallel and series wiring, I strongly suggest that you do not attempt
to do the hookup yourself... get a competent RV mechanic to show you
how.
If you are building a bigger battery bank, see below for wiring info...
When replacing your batteries, remove the negative
cable first
because this will minimize the possibility of shorting the
battery
when you remove the other cable. Next remove the positive
cable
and then the hold-down bracket or clamp. If the hold down bracket is
severely
corroded, replace it. Dispose the old battery by exchanging
it when
you buy your new one or by taking it to a recycling center.
Please
remember that batteries contain large amounts of harmful lead and acid.
After removing the old battery(s), be sure that the
battery tray and
cable terminals or connectors are clean. Auto parts stores
sell a
cheap wire brush that will allow you to clean the inside of a terminal
clamps and the terminals. If the terminals, cables or hold
down brackets
are severely corroded, replace them. Keep track of the markings you
made
on the cables before replacing them!
Thinly coat the terminals and terminal clamps with a
high temperature
grease or petroleum jelly (Vaseline) to prevent corrosion. Place the
replacement
battery(s) so that the cables will connect to the correct terminals. Be
extra careful here, as reversing the polarity of the battery when
connecting
it may severely damage or destroy some parts of your RV electrical
system.
Replace the hold-down brackets or straps to secure the batteries in
place,
then reconnect the cables in reverse order, i.e., attach the positive
cable first and then the negative cable last.
Before using the battery(s), check the electrolyte
levels and state-of-charge.
Refill or recharge as required.
A word of Caution:
If you have decided to add additional batteries to your rig, be sure to
either use the existing battery compartment or a compartment specially
designed and vented for batteries. Never place batteries in an unvented
compartment as potentially explosive hydrogen gas will build up. Never
place batteries in any compartment where electrical sparks or other
ignition
sources may exist. ( a simple 12 volt light with a switch on it is an
excellent
source of ignition spark!!) Notice that the existing battery
compartment
on your rig is (or, at least, it should be!!) isolated from all other
areas
of the rig and possible ignition sources. Also, be sure to secure
batteries
with straps or brackets to prevent movement when the rig is in motion.
An unsecured battery may tip over and spill acid, or worse, may short
out
against the rig frame or other metal objects and cause a fire. If you
are
setting up a new battery bank in your rig, don't do a
half-assed job!
Care of your
batteries
Now that you have made the choice of what kind of batteries you will
use, and have successfully installed them in your rig, it's time to
talk
about maintenance. In order to get the most from your new batteries,
you
can't just forget them now and expect them to work for you forever. It
is very important to take good care of your new batteries and treat
them
right.
You must keep an eye on the electrolyte level in the
batteries. Most
premature failures are caused by low electrolyte levels, and there's
just
no excuse for it, as it's simple and cheap to keep the batteries filled
to the top. Electrolyte is lost whenever the batteries are charged and
also when the batteries are discharged heavily. You should check the
level
in each cell of your batteries regularly. I recommend at least once a
month,
but it may be necessary to check and top off your batteries more often,
depending on usage and how you charge them. At all costs, you must keep
the electrolyte level above the plates at all times. In the warmer
climates
and during the summer, check the electrolyte levels more frequently. To
replenish the electrolyte, add distilled water as
required.
Never add acid-- just distilled water and do not overfill. Never
use anything except distilled water! Tap water contains a lot of
chemical
and mineral impurities and will kill your battery before it's time.
A
word of Caution: Batteries
contain a sulfuric acid electrolyte which is a highly corrosive liquid.
Don't get any on you! In case of a spill or splash, immediately flush
the
affected area with lots of cold water to dilute the acid. A mixture of
baking soda and water can also be used to neutralize the acid, but
watch
out for the foam that will be generated! Be careful and pay attention
to
what you are doing! Also, avoid generating sparks, smoking or open
flames
in the vicinity of batteries.... batteries produce flammable hydrogen
gas
(remember the Hindenburg?) and can explode violently if the gas is
ignited.
This is especially important when batteries are housed inside any sort
of compartment. Again, protective clothing and safety glasses are
recommended
to protect you in case of accident. Please treat batteries with the
respect
they deserve.
Maintaining the correct electrolyte levels,
tightening loose hold-down
clamps and terminals, and removing corrosion is normally the only
preventative
maintenance required for a battery. However, you can extend your
battery's
life by keeping your battery charged properly and avoid deep
discharges.
Let me explain:
A battery "cycle" is one complete discharge and
recharge cycle. It is
usually considered to be discharging from 100% to some point not lower
than 20%, and then charging back up to 100%. Battery life is directly
related
to how deep the battery is cycled each time. If a battery is discharged
to only 50% each cycle, it will last about twice as long as if it is
cycled
to 20%. Running the battery down totally flat will have a very negative
effect on the lifespan of the battery. See the table below for voltages
as related to depth of discharge. This chart is designed to be used
when
monitoring a battery under load. This chart is a little more useful to
the average RVer, as we are most interested in monitoring the state of
charge of our battery bank while it is actually in use. See the Testing
your batteries section below for information on determining open
circuit state of charge using either a volt meter or a
specific gravity
tester.
Voltage
State
of Charge
12.6+
100%
12.5
90%
12.42
80%
12.32
70%
12.20
60%
12.06
50%
11.9
40%
11.75
30%
11.58
20%
11.31
10%
10.5
0%
Avoid
discharging the battery below the 40%
level whenever possible.
If the battery
has been charging, then it's important
to let the battery set for 2 to 3 hours without a load or charger
connected
to stabilize before testing. Otherwise, your reading will be high,
caused
by a phenomenon called "surface charge" It is also necessary
to invest
in a good digital voltmeter.... it's the only meter that will offer the
necessary accuracy to properly test your battery system. That little
analog
gauge that is part of your RV monitor panel is not very accurate or
useful.
It's possible to install your own panel mount digital voltmeter... I'll
tell you more about that in the section on monitoring. For now, it's
important
that you understand that your battery's life is adversely affected by
too
deep a discharge.
At this point,
it's also important to note that
the battery voltage will be affected by temperature.... The chart
above,
and most other ratings applied to Lead/Acid batteries assume that the
battery
is at room temperature: 21 degrees C or about 70 degrees F. As the
temperature
of the battery drops, so will the fully-charged voltage reading. I have
found a lot of conflicting information about this phenomenon, but it
seems
to be safe to say that for each 10 degrees F drop in temp, you can
expect
to see the voltage drop about a tenth of a volt. (.10 volt) That means
that a battery at 32 degrees F with a no-load voltage reading
of
12.35 volts is fully charged.
Battery capacity
(how many amp-hours it can hold)
is reduced as temperature goes down, and increased as temperature goes
up. This is why your car battery dies on a cold winter morning, even
though
it worked fine the previous afternoon. At freezing, the battery's
capacity
is reduced by 20%. At approximately -22 degrees F (-27 C), battery AH
capacity
drops to 50%. Capacity is increased at higher temperatures - at 122
degrees
F, battery capacity would be about 12% higher. Even though battery
capacity
at high temperatures is higher, battery life is shortened.
Battery
capacity is reduced by 50% at -22 degrees F - but battery LIFE
increases
by about 60%. Battery life is reduced at higher temperatures - for
every
15 degrees F over 77, battery life is cut in half. In reality, this is
fascinating information, but isn't really terribly important. Most
RVers
experience a wide range of temperatures and conditions, so your
batteries
will average out just fine... I only include this information to give
you
some feel for the fact that temperature plays a part in battery life
and
capacity. Don't worry about it!
You should recharge a deep cycle battery as soon as possible after
each use. It is very hard on a deep cycle battery to sit for extended
periods
in a partially charged state. To charge the battery, you can use a wide
variety of methods. Most RVs provide some sort of converter/charger to
"charge" the batteries when you're plugged into an A/C source. Most
rigs
also have some sort of provision to charge the house batteries from the
motorhome or tow vehicle engine. We'll get into that in detail in the
next
section.
Charging your
batteries
OK, for you techie types, here are the specs for charging deep cycle
flooded cell batteries:
Most flooded batteries should be charged at no more
than the "C/10"
rate for any sustained period. "C/10" is the battery capacity in
amp/hours
divided by 10. For a 220 AH battery, this would equal 22 Amps. Charging
at 15.5 volts will give you a 100% charge on Lead-Acid batteries. Note
that flooded batteries MUST bubble (gas) somewhat to ensure a full
charge,
and to mix the electrolyte. Float voltage for Lead-Acid batteries
should
be about 2.15 to 2.23 volts per cell, or about 12.9-13.4 volts for a 12
volt battery. Flooded battery life can be extended if an equalizing
charge
is applied every 10 to 40 days. This is a charge that is about 10%
higher
than normal full charge voltage, and is applied for about 2 to 16
hours.
This makes sure that all the cells are equally charged, and the gas
bubbles
mix the electrolyte. If the liquid in standard wet cells is not mixed,
the electrolyte becomes "stratified". You can have very strong solution
at the top, and very weak at the bottom of the cell.
So you ask: "what does all that mean?" It means that
battery charging
is a little more complicated than most people think. It's not really
safe
to assume that driving your motorhome will keep your house batteries up
to par, or that plugging your trailer in to A/C power and letting the
converter
run will make everything hunky-dory. The truth is, most of the RVs on
the
road have very poorly designed battery charging systems courtesy of the
factory. Why? Well, cost plays a key role in deciding what equipment a
RV will have installed when it's sold. Most RVs depend on the 12volt
converter
to charge the house batteries. In most cases, that's a very poor
compromise!
The life of your batteries will be longer and
happier if you charge
them correctly. The best chargers on the market are 3-stage chargers.
Use
of a good quality 3 stage charger will significantly improve your
battery's
performance and lifespan. These chargers can be purchased separately or
are included as part of many of the better quality inverters. When
using
a 3 stage charger, battery charging takes place in 3 basic stages:
Bulk,
Absorption, and Float.
Bulk Charge - The first stage of 3-stage battery
charging. Current is
sent to batteries at the maximum safe rate they will accept until
voltage
rises to near (80-90%) full charge level. Voltages at this stage
typically
range from 10.5 volts to 15 volts. There is no "correct" voltage for
bulk
charging, but there may be limits on the maximum current that the
battery
and/or wiring can take.
Absorption Charge: The 2nd stage of 3-stage battery
charging. Voltage
remains constant and current gradually tapers off as internal
resistance
increases during charging. It is during this stage that the charger
puts
out maximum voltage. Voltages at this stage are typically around 14.2
to
15.5 volts.
Float Charge: The 3rd stage of 3-stage battery
charging. After batteries
reach full charge, charging voltage is reduced to a lower level
(typically
12.8 to 13.2 volts) to reduce gassing and prolong battery life. This is
often referred to as a maintenance or trickle charge, since it's main
purpose
is to keep an already charged battery from discharging.
Converters
vs. real battery chargers
As stated above, the converter in your RV really isn't designed to
be a decent battery charger. It's main purpose in life is to provide 12
volt power for your rig while you are plugged in to an A/C outlet.
Since
the converter is designed to not exceed a voltage of about 13.5 volts,
it will never fully charge your batteries. Also, after it has succeeded
in partially charging your batteries, it will then commence to boil off
electrolyte, as the "float" voltage is too high (should be about 13.2
volts
max.). If you plug your rig into A/C power for months at a time, you
MUST
keep a close eye on your battery's electrolyte level. It is very common
for a converter to boil a battery dry in a month or two. Don't let it
happen
to you! If you must live with your converter, it is a big help if you
unplug
it or switch it off when the rig is in storage and attached to A/C
power.
Just run the converter overnight once a month or so and it will be much
easier on your batteries. Another significant disadvantage to the
converter
is that most units aren't capable of delivering their rated amperage to
the batteries to charge them. Older converters will only manage about
10
or 15 amps and will put out significantly less when powered by a
generator.
A much better choice is to replace your converter
with a modern 3 stage
battery charger. These units are fully automatic and can be left
plugged
in continuously without damaging your batteries. They provide much
higher
charging current than a converter and will fully charge your batteries
in short order, even on generator power. Many better inverters include
a 3 stage battery charger as part of the unit. You can also buy just
the
charger and replace your existing converter with it, as it will handle
all the functions of the converter and keep your batteries in shape
too!
Unfortunately, these chargers aren't cheap... you can expect to pay
from
$50 to $400 for one, depending on ratings and features. Still, if you
need
to replace a failing converter or are considering getting an inverter,
don't miss the chance to get a 3 stage charger. They really are worth
the
money if you use your batteries a lot.
Testing your
batteries
This section gets a bit technical, but is included to help you diagnose
battery problems. If your 12 volt system isn't performing as well as
you
expect, it's time for some tests to determine what's wrong...
First off, visually inspect for obvious problems....
for example; damaged
cases, corroded terminals or cables, loose hold-down clamps or cable
terminals,
or low electrolyte.
If you have just recharged your battery,
then a phenomenon known
as "surface charge" will cause the battery voltage to be higher than
normal.
To insure accurate readings, you must eliminate any surface charge
before
testing. Use one of the following methods;
1. Allow
the battery to sit for six hours with no load or charger connected,
or...
2. Apply
a 25 amp load for three minutes and wait five minutes, or...
3. With
a battery load tester, apply a 150 amp load for 10-15 seconds.
The battery under test must be disconnected from any
load or charger
when testing. This is referred to as "Open Circuit". Use the following
table, determine the battery's state-of-charge. The best way to measure
the state-of-charge is to check the specific gravity in each cell with
a hydrometer. A temperature compensating hydrometer will cost
approximately
five dollars at an auto parts store. If the battery is sealed, then the
correct procedure to test it is to measure the battery's voltage with a
good quality digital DC voltmeter with an accuracy of .5% or better.
Voltages
are shown for both 12 volt and 6 volt batteries.
Check both the specific gravity in each cell with a external hydrometer
AND the battery terminal voltage with a digital voltmeter without the
engine
or converter/charger running. If the state-of-charge is BELOW
75%
using either the specific gravity or voltage test then the battery
needs
to be recharged BEFORE proceeding.
Replace the battery, if one or more of the following conditions occur:
If there is a .050 or more difference in the
specific gravity reading between
the highest and lowest cell, you have a weak or dead cell(s),
If the battery will not recharge to a 75% or more
state-of-charge level.
If digital voltmeter connected to the battery
terminals indicates 0 volts,
you have an open cell, or if the digital voltmeter indicates 10.45 to
10.65
volts (5.2 to 5.35 volts for a 6 volt battery), you have a shorted
cell.
[A shorted cell is caused by plates touching, sediment build-up or
"treeing"
between plates.
Winter Storage
Most RVs used for recreation are stored for long periods of time in
the winter months. This storage can be very hard on your batteries if
you
don't take care of them. Batteries in storage self-discharge over time.
This is a natural phenomenon and will cause your batteries to slowly go
flat. Deep discharges drastically shorten your batteries life.
Extremely
cold temperatures can cause your batteries to freeze if they aren't
adequately
charged. A battery close to fully charged is far more resistant to
freezing
than a partially charged battery. Freezing will normally kill a flooded
cell battery dead. Some of the gell batteries and most of the AGM type
batteries are more resistant to damage from freezing, but
it's better
to prevent it. To avoid all this potential mayhem, some charging
current
will have to be applied to the batteries periodically during the
storage
period.
To keep your battery safe through the winter storage
period, consider
removing the batteries and storing then in a warmer place, like a
garage.
Check the voltage once a month and do an overnight recharge if the
voltage
falls to the 80% state-of-charge point. (see charts above). If removing
the batteries just isn't possible, then there are several things that
you
must do when the rig is put into storage.
Ensure that ALL electrical loads are disconnected
from your house batteries.
There are lots of things in your RV that may put a tiny load on your
batteries
even though everything is "off". Most stereo receivers, electronically
controlled refrigerators and smoke, CO2 and Propane detectors all are
tiny
drains on the batteries. Even if the current draw is only a few
milliamps,
over time these "phantom loads" will run your batteries flat! Best bet
is to identify which 12 volt fuses protect these units and remove them.
It is a real good idea to check at the battery with an ammeter to
ensure
that there is no current drain.
Provide for some sort of charging to offset the
batteries tendency to self-discharge.
This can be provided by a small solar panel or trickle charger, or the
converter or 3 stage charger in your RV. It is best to let the
batteries
discharge slightly over a few weeks or a month and then do a full
recharge
overnight. Trickle chargers and unregulated solar panels can slowly
boil
off electrolyte, or worse, fail to maintain the charge, allowing your
batteries
to become deeply discharged. If your RV has a standard converter, do
not leave it plugged in constantly to keep your batteries up!
That
converter will boil your batteries DRY in a big
hurry! If you must
leave your RV plugged into A/C power over the storage period, make sure
to either unplug the converter or switch it off at the breaker. It's
far
better to run the converter overnight every 3 or 4 weeks or so as
needed
to charge the batteries. Another possibility would be to put the
converter
or the whole RV on a simple plug in timer and set it to be "on" for
about
1 hour a day. If you have a smart 3 stage charger, it may be safe to
leave
it plugged in at all times, buy I would pay very close attention to the
electrolyte level in the batteries just in case. Boiling a battery down
to where the plates are exposed to air will cause permanent damage to
the
battery. Don't let this happen to you!
Check on the batteries from time to time during the
storage period. Stop
by at least once a month and check battery voltage and electrolyte
levels.
Don't walk away from your RV batteries in November and expect them to
still
be ready to go in May. Folks that adopt the "Out of sight, out of mind"
approach to battery maintenance are usually the ones buying a new set
of
batteries at the start of every camping season!
The bottom
line....
Pay attention to safety when working with or near
batteries.
Buy only good quality Deep Cycle
batteries for your RV. Golf cart
batteries offer excellent capacity and lifespan at a reasonable cost.
Keep up with battery maintenance... check
electrolyte levels regularly
and pay attention to charging and discharging protocols to increase
lifespan.
Invest in a good digital voltmeter and use it.
Consider replacing that cheesy old converter in
your rig with a better
quality 3 stage charger.
Take care of your batteries during extended storage
periods.
OK, folks... that takes care of part
1 of the 12 volt Side
of Life. Hope you found it helpful! Part 2 deals with Inverters, Solar
systems, Monitoring, Wiring, Lighting and some great do it yourself
projects
for your RV.
Credit- Mark
S. Nemeth 1999
RV 12V Battery Information Part I
Jan Watercraft Products, Since 2001 Thank you for visiting our site.
If you have any questions go to our "CONTACT
US" page and send us a e-mail or call!